How do you create a branching web comic with Comic-BEE?

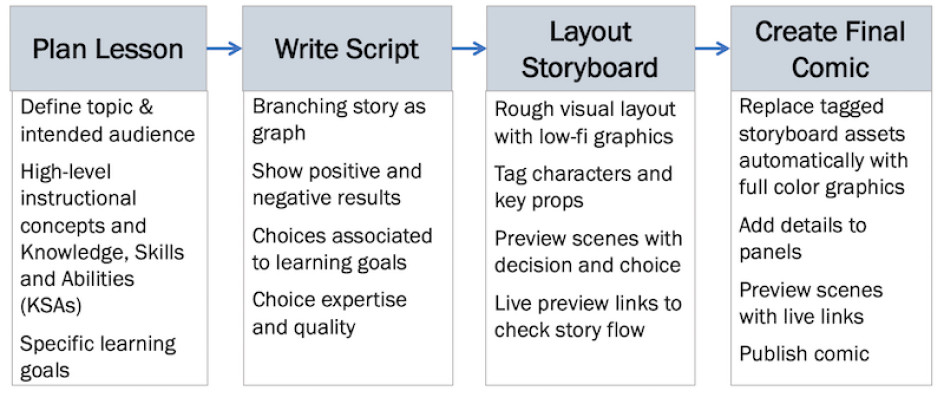
The process of creating a published comic or graphic novel like those you buy at a bookstore typically begins with developing the story details and characters, then creating the visual presentation. This latter step is often a two part process: first creating a quick pencil sketch of word and pictures called a storyboard, and then using that storyboard to guide the creation of final, full color comic panels. However, for a comic that will educate or evaluate, you need to create your lesson plan first to avoid ending up with a fantastic story that does not support your instructional goals. The diagram below represents the four steps to create a branching comic for education:
High level workflow for creating an educational, branching web comic.
Let’s see how that high-level process is supported by Comic-BEE.
Plan Lesson
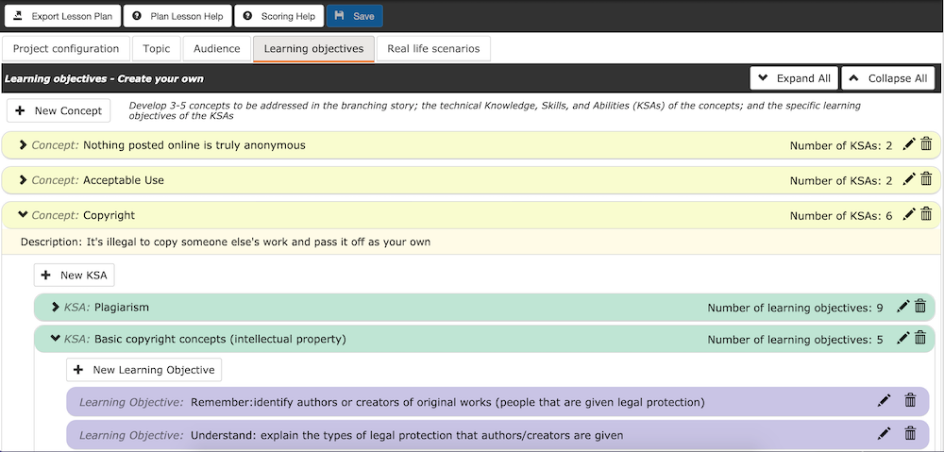
Creating the lesson plan in Comic-BEE
Comic-BEE was designed with input from instructional designers – so it guides you through planning a lesson, even if you’ve never done it before. The lesson plan describes what you want to teach or evaluate. You can either create your own lesson plan from scratch or use the NICE Cybersecurity Workforce Framework that describes cybersecurity work and which is integrated into Comic-BEE.
Comic-BEE steps you through questions about your topic and audience. The core of the lesson plan is a hierarchy of high-level instructional concepts that each have more specific knowledge, skills & abilities (KSAs). For each KSA you should define at least one Learning Objective, which is a fine-grained, specific learning goal, such as a concrete thing the learner should be able to know or do.
When you’ve completed the lesson plan, you have the option of adding Real Life Scenarios, which can be brief summaries of personal experience involving decisions, or scenarios taken from the headlines. Creating Real Life Scenarios can get you thinking about stories and your lesson plan, and the scenarios can be building blocks for your branching script.
Write Script
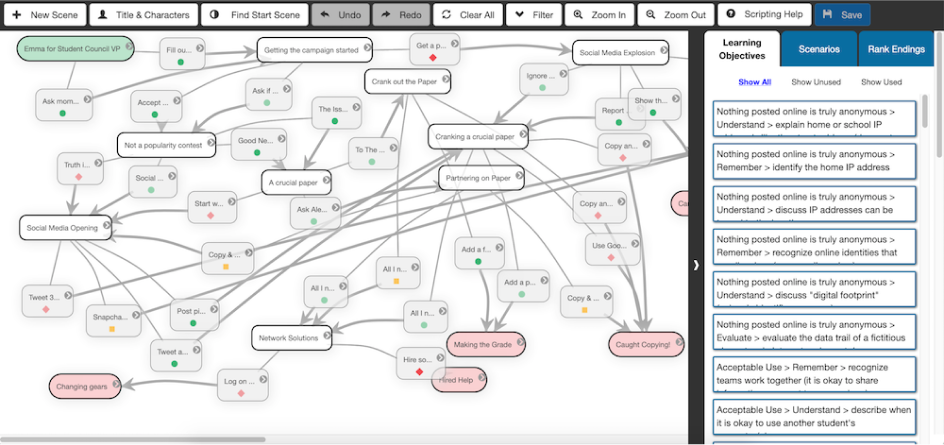
Creating the lesson plan in Comic-BEE
The branching script in Comic-BEE is rendered as a graph – the individual scenes are nodes in the graph, and the scene’s choices are edges which connect the nodes. Create your script one scene at a time, perhaps using some of the Real Life Scenarios from your lesson plan to get started. In a future blog post, we’ll discuss detailed strategies for writing your script, but remember that you’re writing a comic, not a novel: focus on the who, what, where, when, how and why needed to drive the story.
As you’re writing a scene, you want to create several different choices that will lead to different outcomes, some positive, some negative. A choice from one scene is the connection to a related scene, creating your story branches. To ensure alignment with your lesson plan–especially important for a scored comic–associate at least one learning objective to each choice, and rate both the expertise and quality of that choice.
As you create your script, select a title for your comic and define your primary characters. This last step will allow you to take advantage of Comic-BEE’s automation capabilities when creating your final comic.
Layout Storyboard
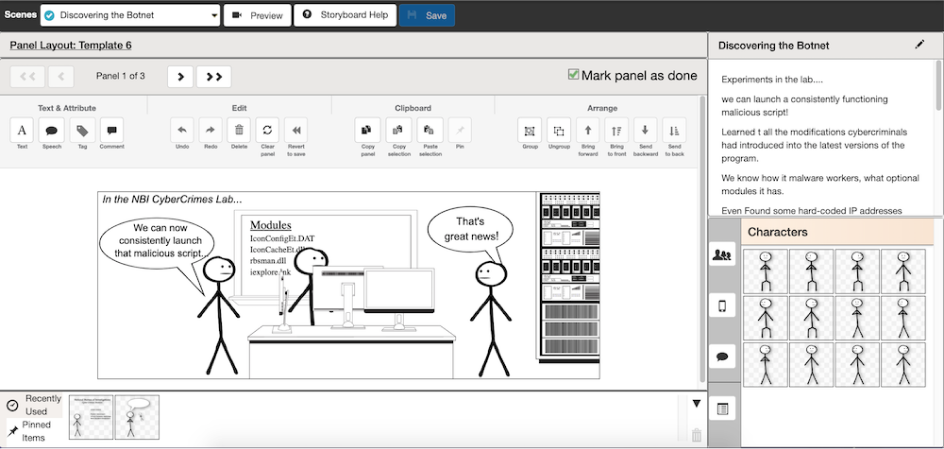
Storyboarding in Comic-BEE.
Storyboarding is the process to visually lay out a story, using low-fidelity assets – like stick figures in different poses and basic shapes. A storyboard is a quick sketch that helps you figure out how to best tell the story and see what fits in the space: a comic is mostly pictures with a minimum of words. Add just the essentials of what is happening in the scene; don’t get bogged down adding details at this stage.
Comic-BEE provides different templates for laying out the different panels that comprise a single scene – from a scene that is just one panel, or up to six panels in a scene. When you add characters and essential props in the storyboard, tag them with names. This tagging will let you automatically swap out the low-fidelity storyboard assets for the full-color assets in your final comic.
A preview feature lets you see all the panels for a scene and determine if they are complete, and consider the scene with its question and choices. The links for the choice buttons are live in Preview pages, so you can jump to the next scene and sanity check your storyline: does it make sense or is there a gap in the action, indicating a missing scene (it happens!)?
Final Comic
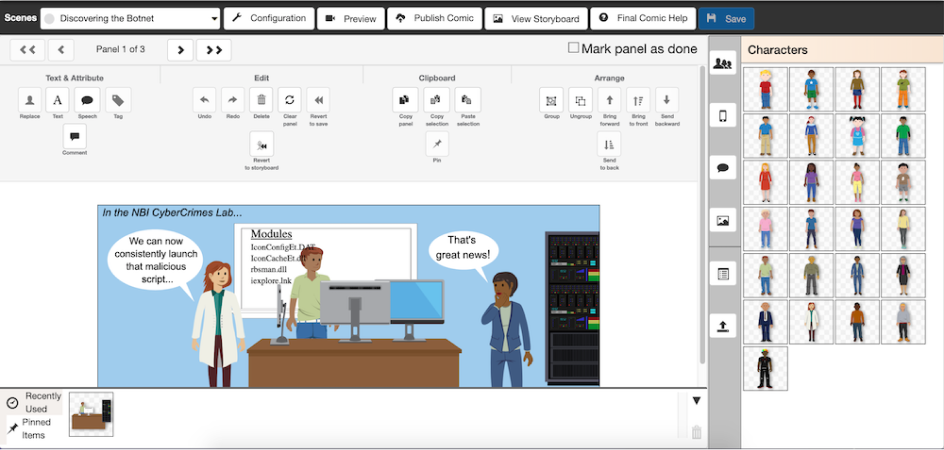
Storyboarding in Comic-BEE.
As you begin working on your final comic, use the automation in Comic-BEE to replace all the low-fidelity character and prop assets that you tagged in your storyboard with the full color graphic assets of your choice. Once the basic panels are ready, it is time for you to add details such as backgrounds, floors, the additional props that turn blank space room into an office or classroom, as well as computing devices and interfaces. Preview helps you check continuity between scenes and verify all is complete before you publish your comic.
As you can see from the above, Comic-BEE’s integration of the diverse workflows with scaffolding at every step of the comic- creation process enables you to rapidly create branching web comics for education. Sign up for a free trial or request a demo of Comic-BEE today!